Deploy from Forgejo
Use a Forgejo connection to create and publish an application from a Git repository, including an instance hosted by your organization. The connection belongs to the organization; you select the repository when creating each project.
Before you start
- Have the Forgejo instance's HTTPS address with a valid, trusted TLS certificate. The instance must also be reachable through your organization's connection; opening it in your browser does not confirm that access.
- Have an account with repository access and create a personal access token with the narrowest scope required. For source reads and manual publishing, use
read:repository. For automatic events, usewrite:repositoryand an account that can administer repository hooks. - Note the full repository path in the
team/applicationformat. Forgejo repository discovery is not available: enter the path in Console. - For automation, the Forgejo instance must be able to reach the hook URL provided by Zenifra over HTTPS. Zenifra's connection to Forgejo and Forgejo's event delivery are separate requirements.
The write:repository scope does not make the account a repository administrator. Forgejo tokens in Specific repositories mode also cannot perform administrative operations, even if the token owner could normally perform them. Since hooks require repository administration, use a dedicated identity with access only to the required repositories and repository-admin permission on them. When creating the token, choose All (public, private, and limited) and include write:repository; do not use a site-admin account. For a read-only connection, a Specific repositories token can be limited to selected repositories and use read:repository. See the official Forgejo 16.0 documentation on access token scopes and repository permissions and webhooks.
Create the project and connect Forgejo
-
In Console, open Projects and choose New project.
-
Choose HTTP Application, select a plan, and enter the project information.
-
Open Advanced settings. Set Project source to Git repository and Git provider to Forgejo.
-
Select an existing Forgejo connection for the organization. If there is none, create it in the same form: enter the Instance address, Connection name, Repository path (
team/application), Username, and Access token, then choose Connect repository. Do not include the Forgejo domain in the path or put the token in URLs or Git commands.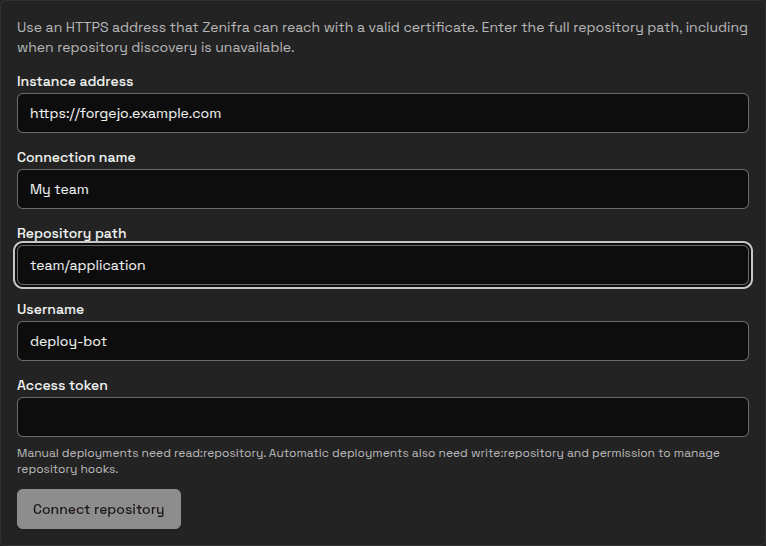
Real Console capture with illustrative data; the token field is empty. The image shows the form before the connection is confirmed.
-
Select an existing initial branch, such as
main, and a publishing mode for future updates. -
Choose the runtime and version. Enter preparation, build, and start commands that match the repository.
-
Create the project. Its first build starts with creation and uses the selected initial branch.
After creation, open the latest build in Console. Confirm that it succeeded, check the source commit SHA, and compare it with the expected commit. For example, run git rev-parse main for the main branch or git rev-parse 'v1.0.0^{commit}' for a tag. Once the build is ready, open the application's address and check its main flow.
Publish updates
A manual action remains available for every publishing mode. Automatic modes use repository events and hooks; choose only one of them.
| Mode | What starts a publication |
|---|---|
| Manual | An action in Console or the CLI. You can publish the selected branch or a specific commit. |
| Branch | A push to the selected branch, such as main. |
| Tag | A pushed tag whose name matches the configured pattern, such as v*. |
| Release | A published Forgejo release linked to a tag that matches the pattern. Drafts are not published; pre-releases are ignored by default and can be included in the mode's settings. |
In the terminal, assume the forgejo remote points to the repository on your instance. Pushing the selected branch starts a publication in Branch mode:
git push forgejo mainFor Tag mode, create and push a tag for the commit to publish. The tag must be sent to Forgejo; creating it only in your local copy does not start a publication:
git tag -a v1.0.0 -m "Release v1.0.0"
git push forgejo v1.0.0
For Release mode, push the tag and then open the repository in Forgejo. Go to Releases, choose New Release, select the v1.0.0 tag, add a title and notes, and publish. Saving a draft does not publish the release or start a build. A pre-release is a published release marked as a pre-release, not a draft; it starts a build only when the option to include pre-releases is enabled. Forgejo documents tags and releases as distinct features: a tag belongs to Git, while a release adds notes and files associated with that tag.
Tag and Release patterns are matched against the full tag name, are case-sensitive, and accept 1 to 255 characters. The only wildcards are *, for any sequence, and ?, for one character; formats such as bracket classes are not supported.
Automate with the CLI and API
For manual publishing with the CLI, use the documented commands to start a build from a branch and follow its result:
zenifra deploy --project <project-id> --branch main
zenifra deploy watch --project <project-id> --build <build-id>
In the HTTP project creation API, the source is provided in config.source together with config.build. For manual publishing, do not enable auto_deploy and omit version_deploy. For branch pushes, set auto_deploy: true and omit version_deploy. For Tag or Release, keep auto_deploy: false and enable version_deploy with the selected event and pattern. For example, this config.source fragment configures publishing on Release:
{
  "connection_id": "connection-id",
  "repository_id": "repository-id-from-connection",
  "branch": "main",
  "auto_deploy": false,
  "version_deploy": {
    "enabled": true,
    "event": "release",
    "tag_pattern": "v*",
    "include_prereleases": false
  }
}
Do not set auto_deploy: true together with version_deploy.enabled: true; automatic modes are mutually exclusive. See the Git connections reference for the complete request body and public API fields. The existing CLI/GitHub integration remains documented on its own page.
Current limitations
The Forgejo integration does not provide repository discovery, SSH sources, submodules, Git LFS, or pull request preview environments. A GitLab integration is also not currently available. Git source validation rejects symbolic links, hard links, and special files. These limits do not change the existing GitHub integration; see the GitHub deployment guide for options specific to that connection.
The runtime, version, and build commands must match the repository. See Runtimes for Node.js and Python requirements.
Frequently asked questions
The connection validated, but the project cannot read the repository. What should I check?
Confirm the team/application path, the account's access, and the read:repository scope. For a non-public instance, also confirm that it is reachable through the organization's connection and that its HTTPS certificate is trusted.
The push was accepted, but no build started. Why?
Confirm that the project uses Branch mode and follows the same branch that received the push. For any automatic publication, check that the account can administer hooks, that the token has write:repository, and that Forgejo delivered the event. Check the hook's status and delivery history in Forgejo. A PAT in Specific repositories mode cannot administer hooks.
I pushed a tag or created a release, but nothing was published.
For Tag mode, confirm that you pushed the tag to the Forgejo remote and that its name matches the pattern exactly, including capitalization. For Release mode, confirm that you selected Release mode, published the release instead of saving it as a draft, and enabled pre-releases if the release is marked as a pre-release.
The build finished, but the application does not work.
Compare the SHA shown in the build with the branch or tag commit, review the installation and build logs, and confirm the start command and runtime. The Runtimes page describes the available requirements.
Next steps
Last updated on
Automatic Deployment with GitHub Actions
Learn how to configure automatic deployment on Zenifra using GitHub Actions. Full CI/CD tutorial with automatic image updates.
Preview Environments
Create temporary environments for pull requests, test each change on its own URL, and control TTL, variable inheritance, and hourly cost.